So you want to get around by bike...
Everything you've ever wanted to know about getting around your city by bike — especially how to get started.

Have you spotted new bike paths popping up in your city? Maybe more people cycling to work? You might wonder if you could start saving on gas by replacing some of your car trips with cycling, but have reservations about road safety or simply don't know how to start.
If that sounds like you, you're not alone! It can be intimidating or overwhelming to start traveling by bike, especially when it's unclear how to get where you're going with a safe and comfortable route. This post is intended to clear up some of this uncertainty by providing everything you've ever wanted to know in order to help you take that first step roll.
I've personally been through this whole process myself, so I'd love to share what I learned on that journey along with some help and additional input from the wonderful folks at Eastside Urbanism.
This is a long post, and I don't expect you to read every single word in order. Feel free to skim, jump around, and focus on the sections that apply to you most.
Table of Contents:
Plan a Route
Before you even purchase a bike, an important thing you should do is decide on the scope of your trips. For example, you can start small by biking infrequent errands that are short in distance, or simply decide to bike to work a few times a week. This is up to you and your comfort level.
My recommendation is to have a couple of scenarios in mind, as some may align more closely with your level of comfort depending on how safe the road infrastructure along each route is.
Once you have decided the scope of your biking endeavor, you need to figure out how to get there–safely! This is unfortunately not as simple as typing your destination into Google Maps and choosing the cycling option. But there are other tools designed specifically with route comfort and safety in mind that will help you find the best way that suits your needs and help you ride like a local.
Why not Google Maps?
Since writing this post, Google seems to have made efforts to improve bicycle directions in Google Maps by adding more details about which routes involve shared paths, painted lanes, etc.
I haven't had a chance to try out these new features, but it might be worth trying out Google Maps these days despite the below section.
Before we discuss my recommended routing tools, I want to highlight why Google Maps is likely not the best choice for planning your cycle route. There are several important factors that affect road safety, such as whether it has a bike lane, its speed limit, if a bike lane is separated or just a line of paint, if there are any dedicated bike paths you could take, the surface of those bike paths, etc.
Unfortunately, Google Maps rarely takes these considerations into account and often simply does not have the data for them. Additionally, especially if you are in an area with rapidly improving dedicated bike infrastructure, safer routes go entirely unmapped so it will never even offer them to you.
You will also probably want to know what to expect on any given route: how much of the route is bike paths? Will you need to mix with car traffic? Is there any physical protection from fast-moving vehicles? Google Maps does not provide any of this information. There isn't even an option to prefer safer routes!
Software Recommendations
As you read, keep in mind that it's never a bad idea to scope out a route via satellite or street-level imagery if you're unsure about it. It can give you a better idea of what to expect along the way.
Transit — Maps, Routing, Navigation
No, I don't mean you should take a bus or train (although that is a good option too! More on that later.) This app's name is literally just "Transit," and as you might expect its primary purpose is finding routes for busses, trains, ferries, and the like. And it's really good at that! But it also has a bike routing mode, and it's stellar. They also recently added turn-by-turn navigation which was basically the only thing missing, so I can confidently say this is probably the best app for cycling navigation out there.
Pros:
- Thoughtful and comprehensive route safety summaries
- Aggressively prefers safer routes by default
- Uses OpenStreetMap data for routing (and is reasonably up-to-date)
- Great turn-by-turn navigation
Cons:
- No desktop/web app for planning; mobile-only
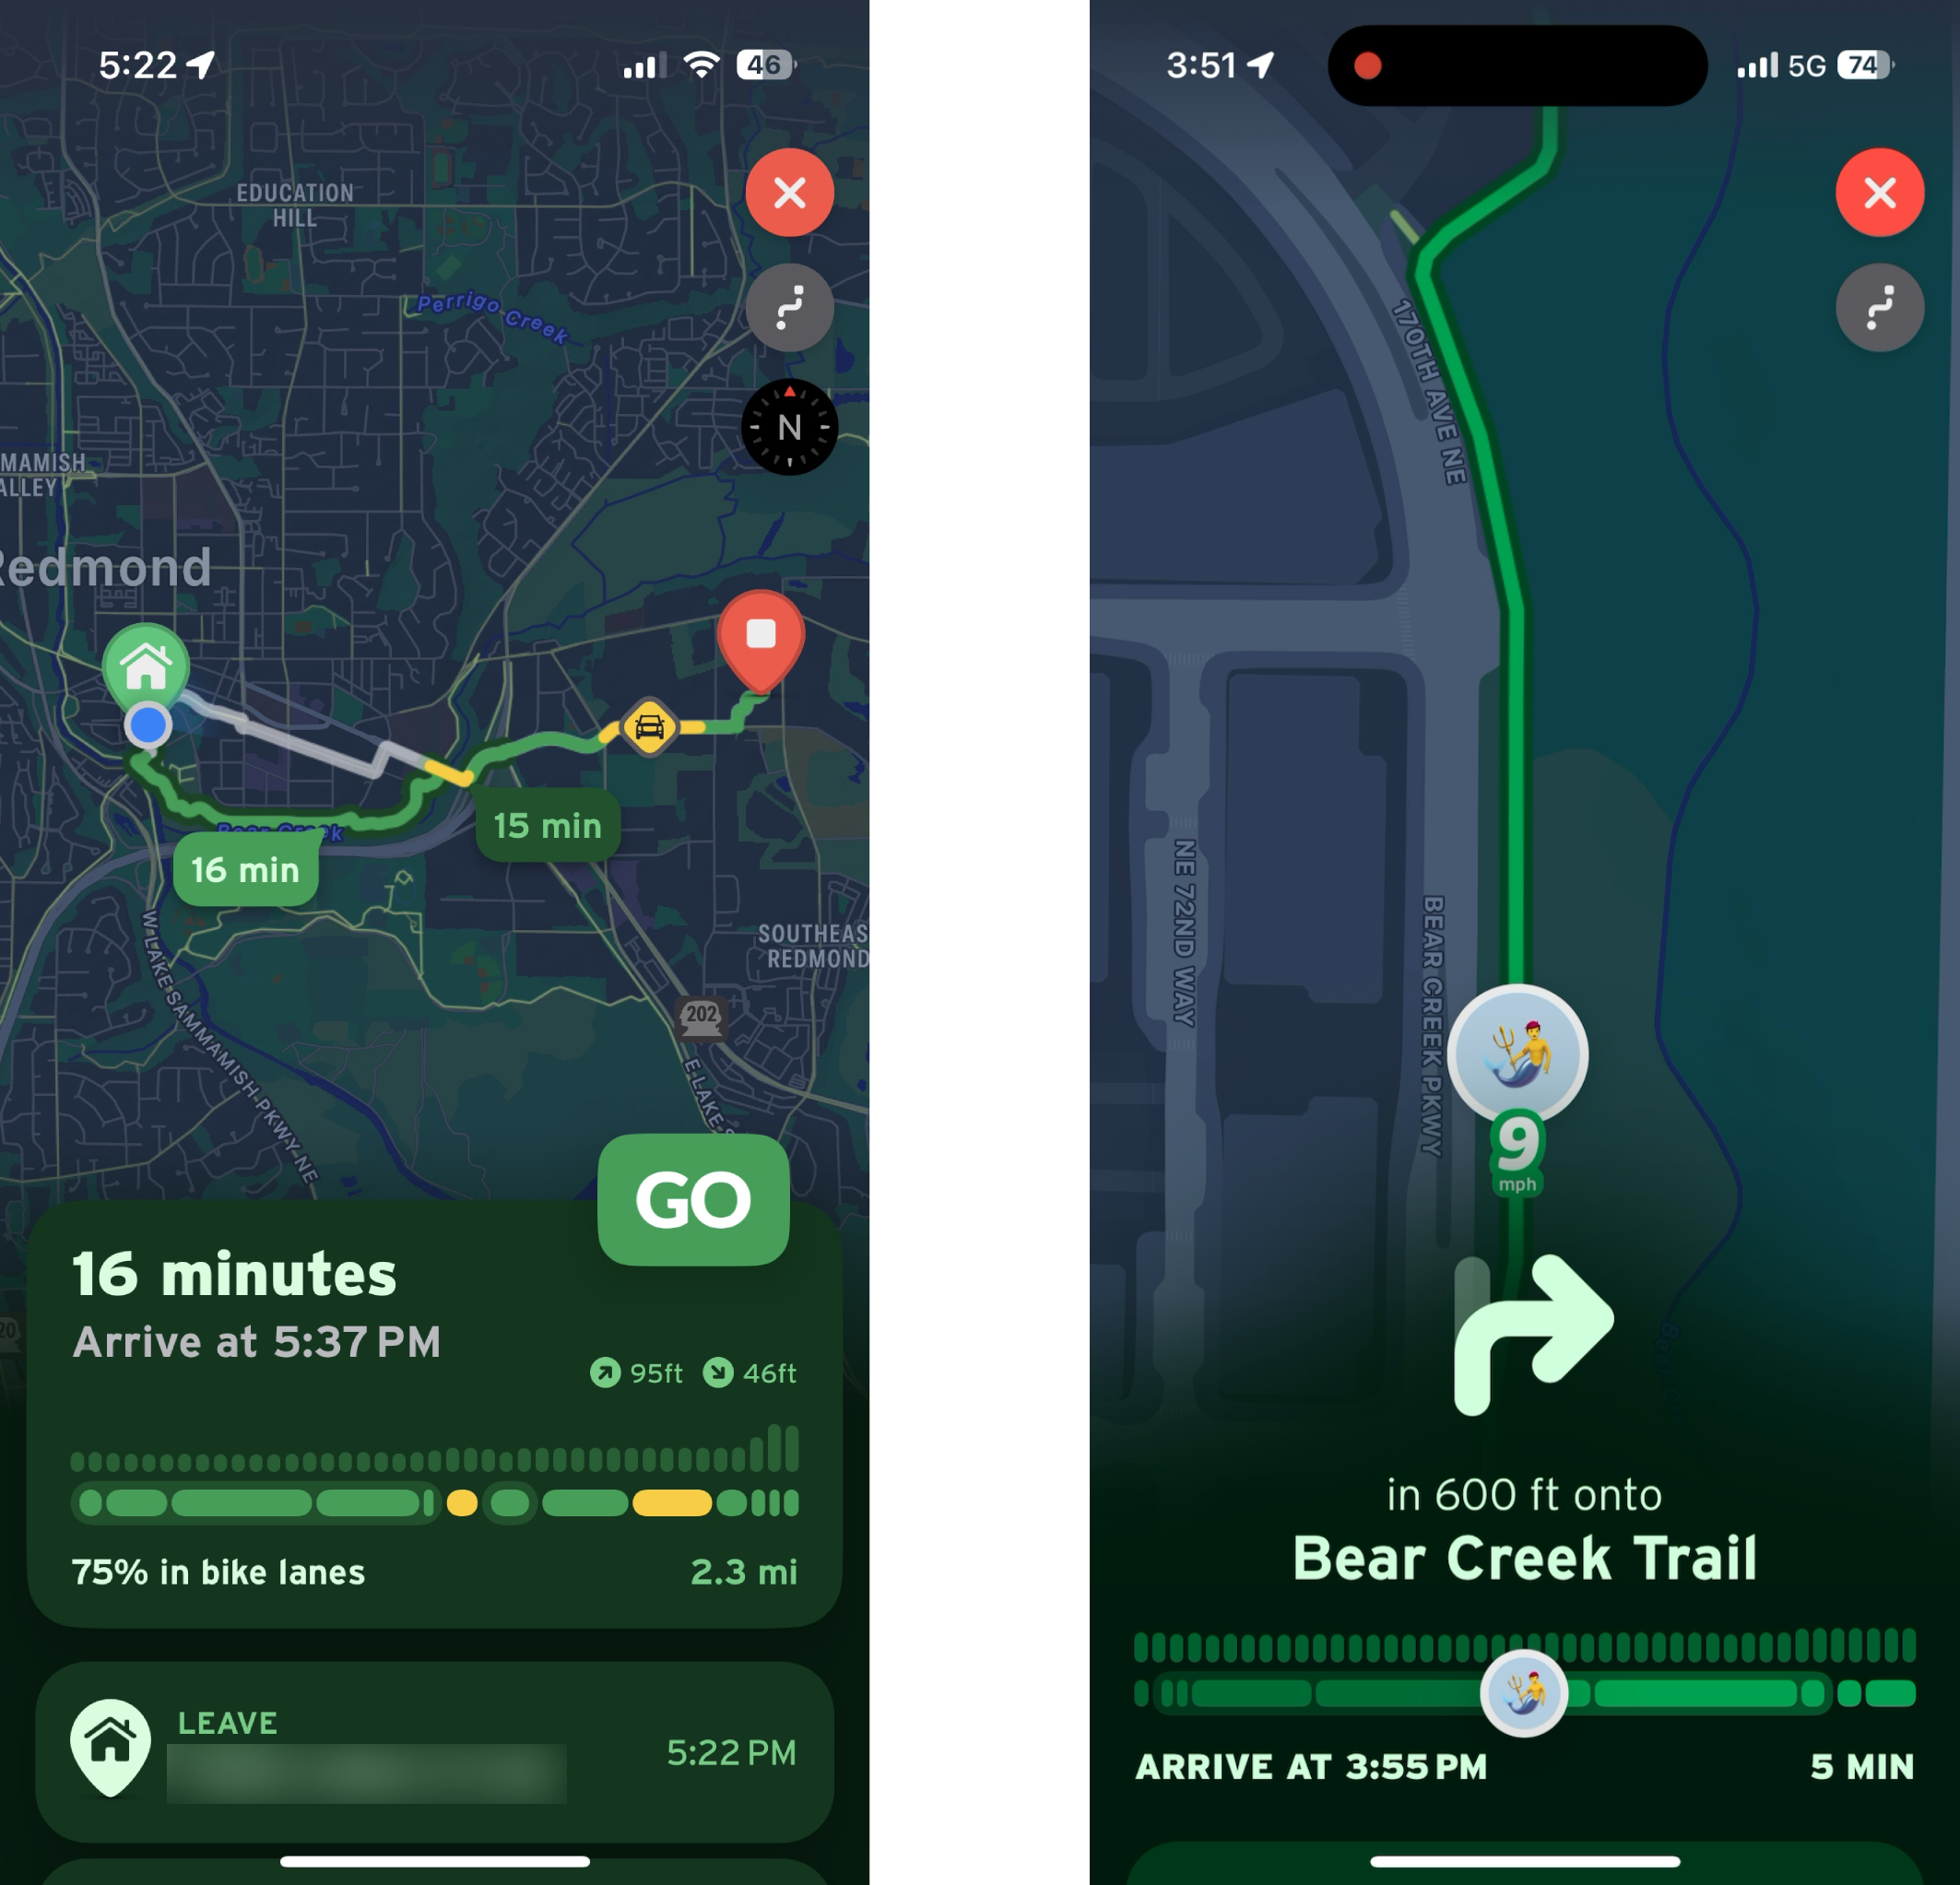
The app offers several routes but will prefer the safest one by default, which is exactly what we want. It provides an excellent summary of the trip, noting the quality of path at each segment, as well as elevation. There are different types of path presented, ordered from best to worst:
- Separated bike lane or path: Indicated by a green line with an outline. This is the highest quality infrastructure you will come across. They are physically separated from main traffic roads and are typically incredibly safe and comfortable to ride on. May or may not be along an existing road.
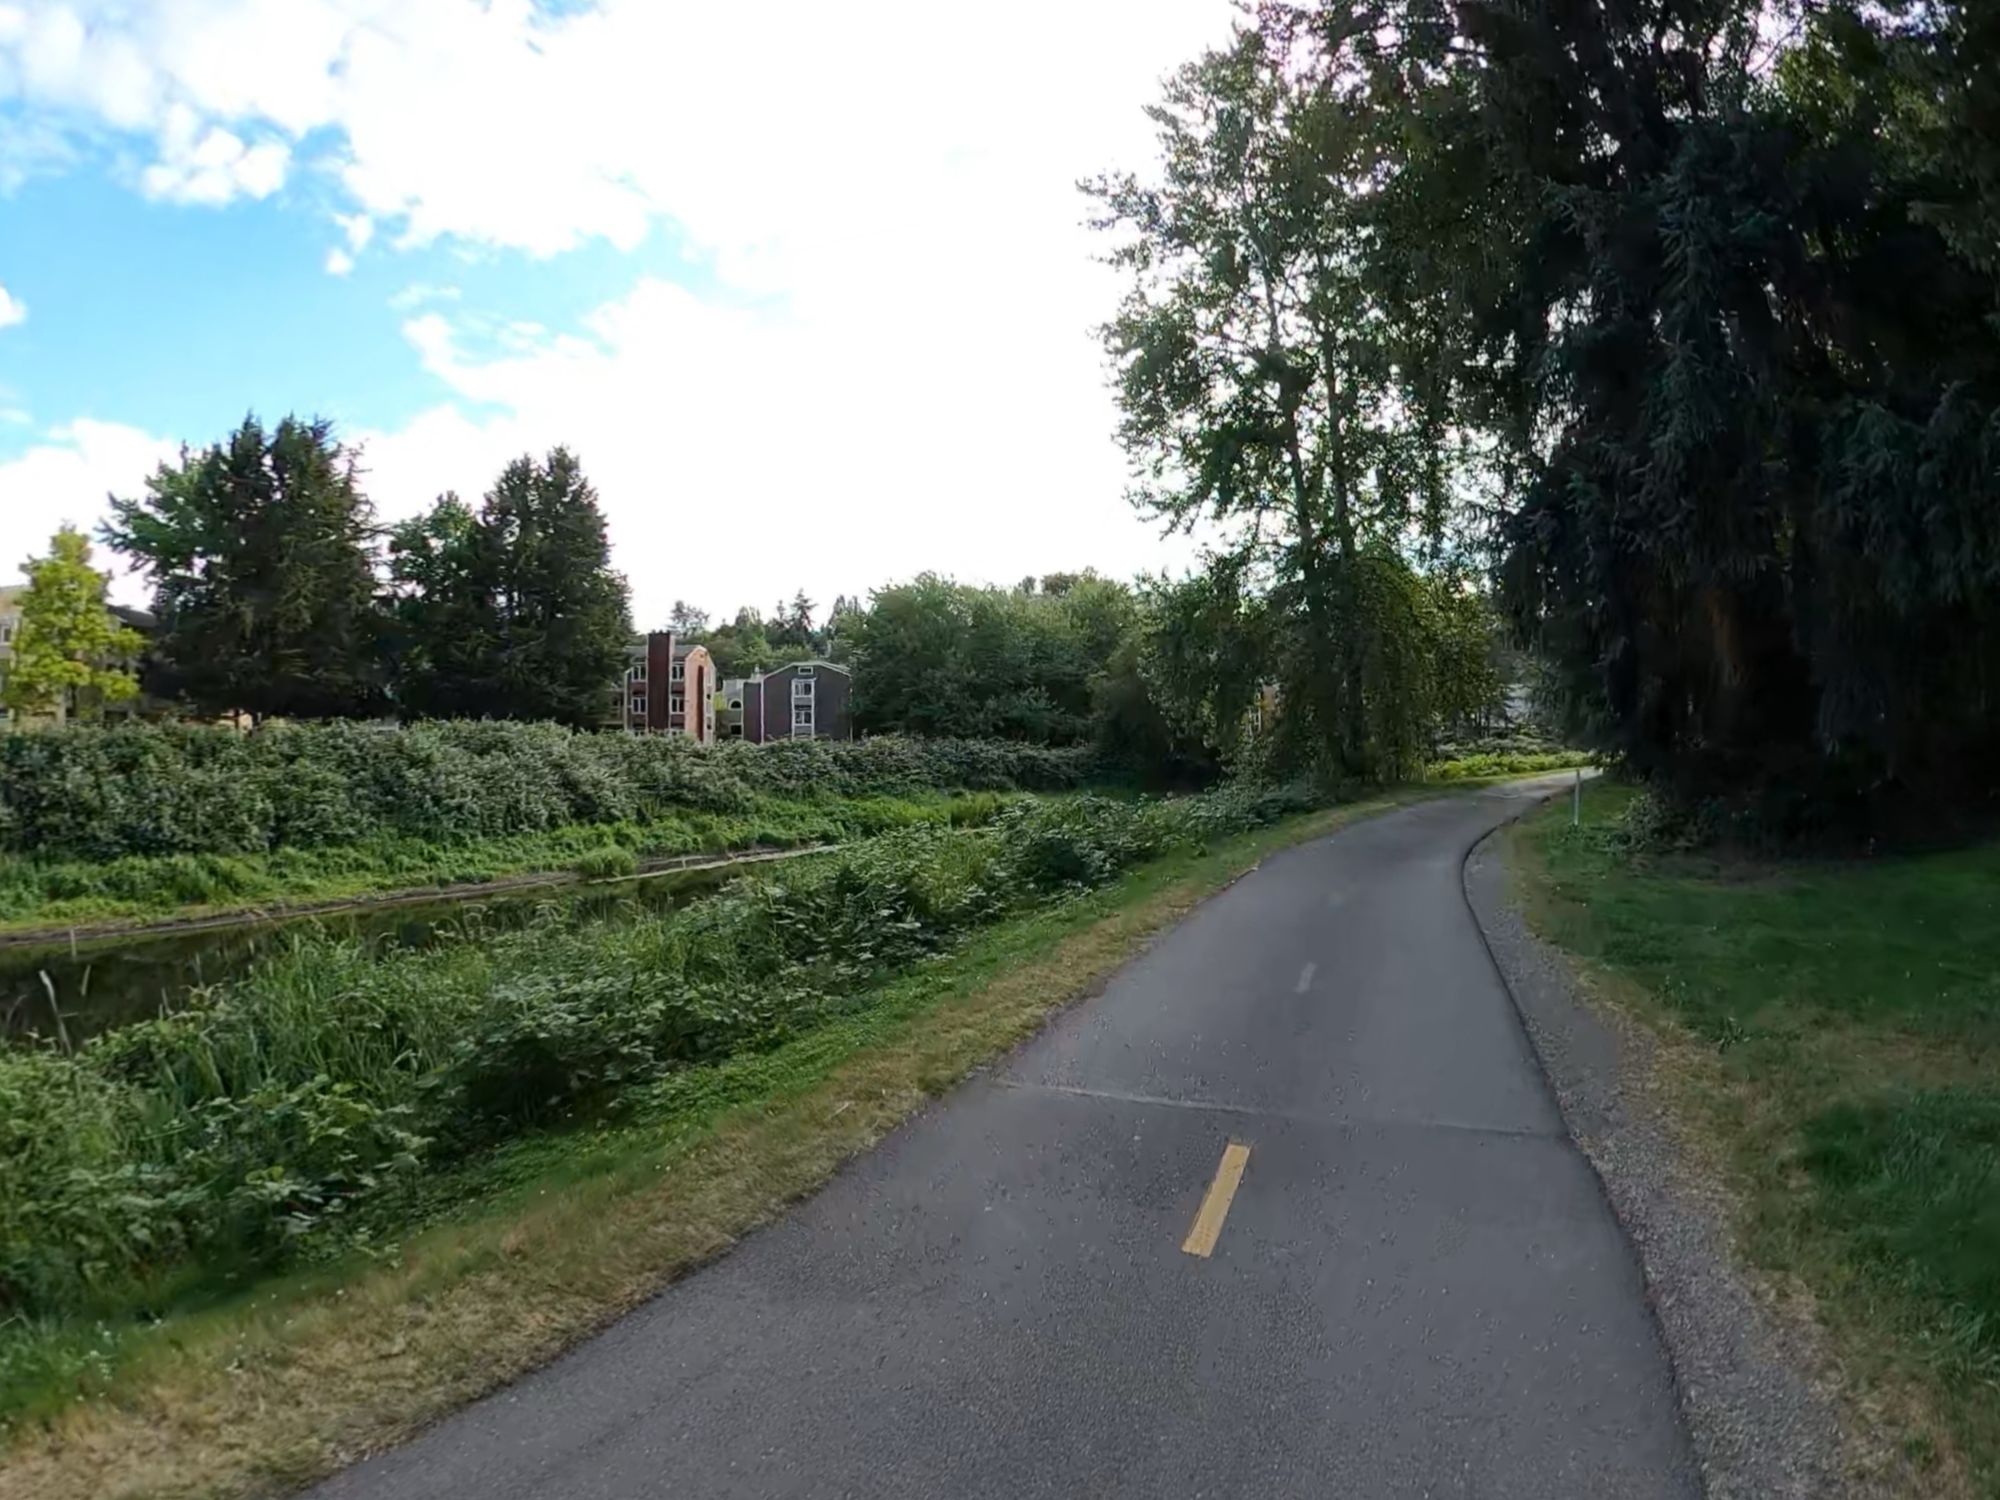
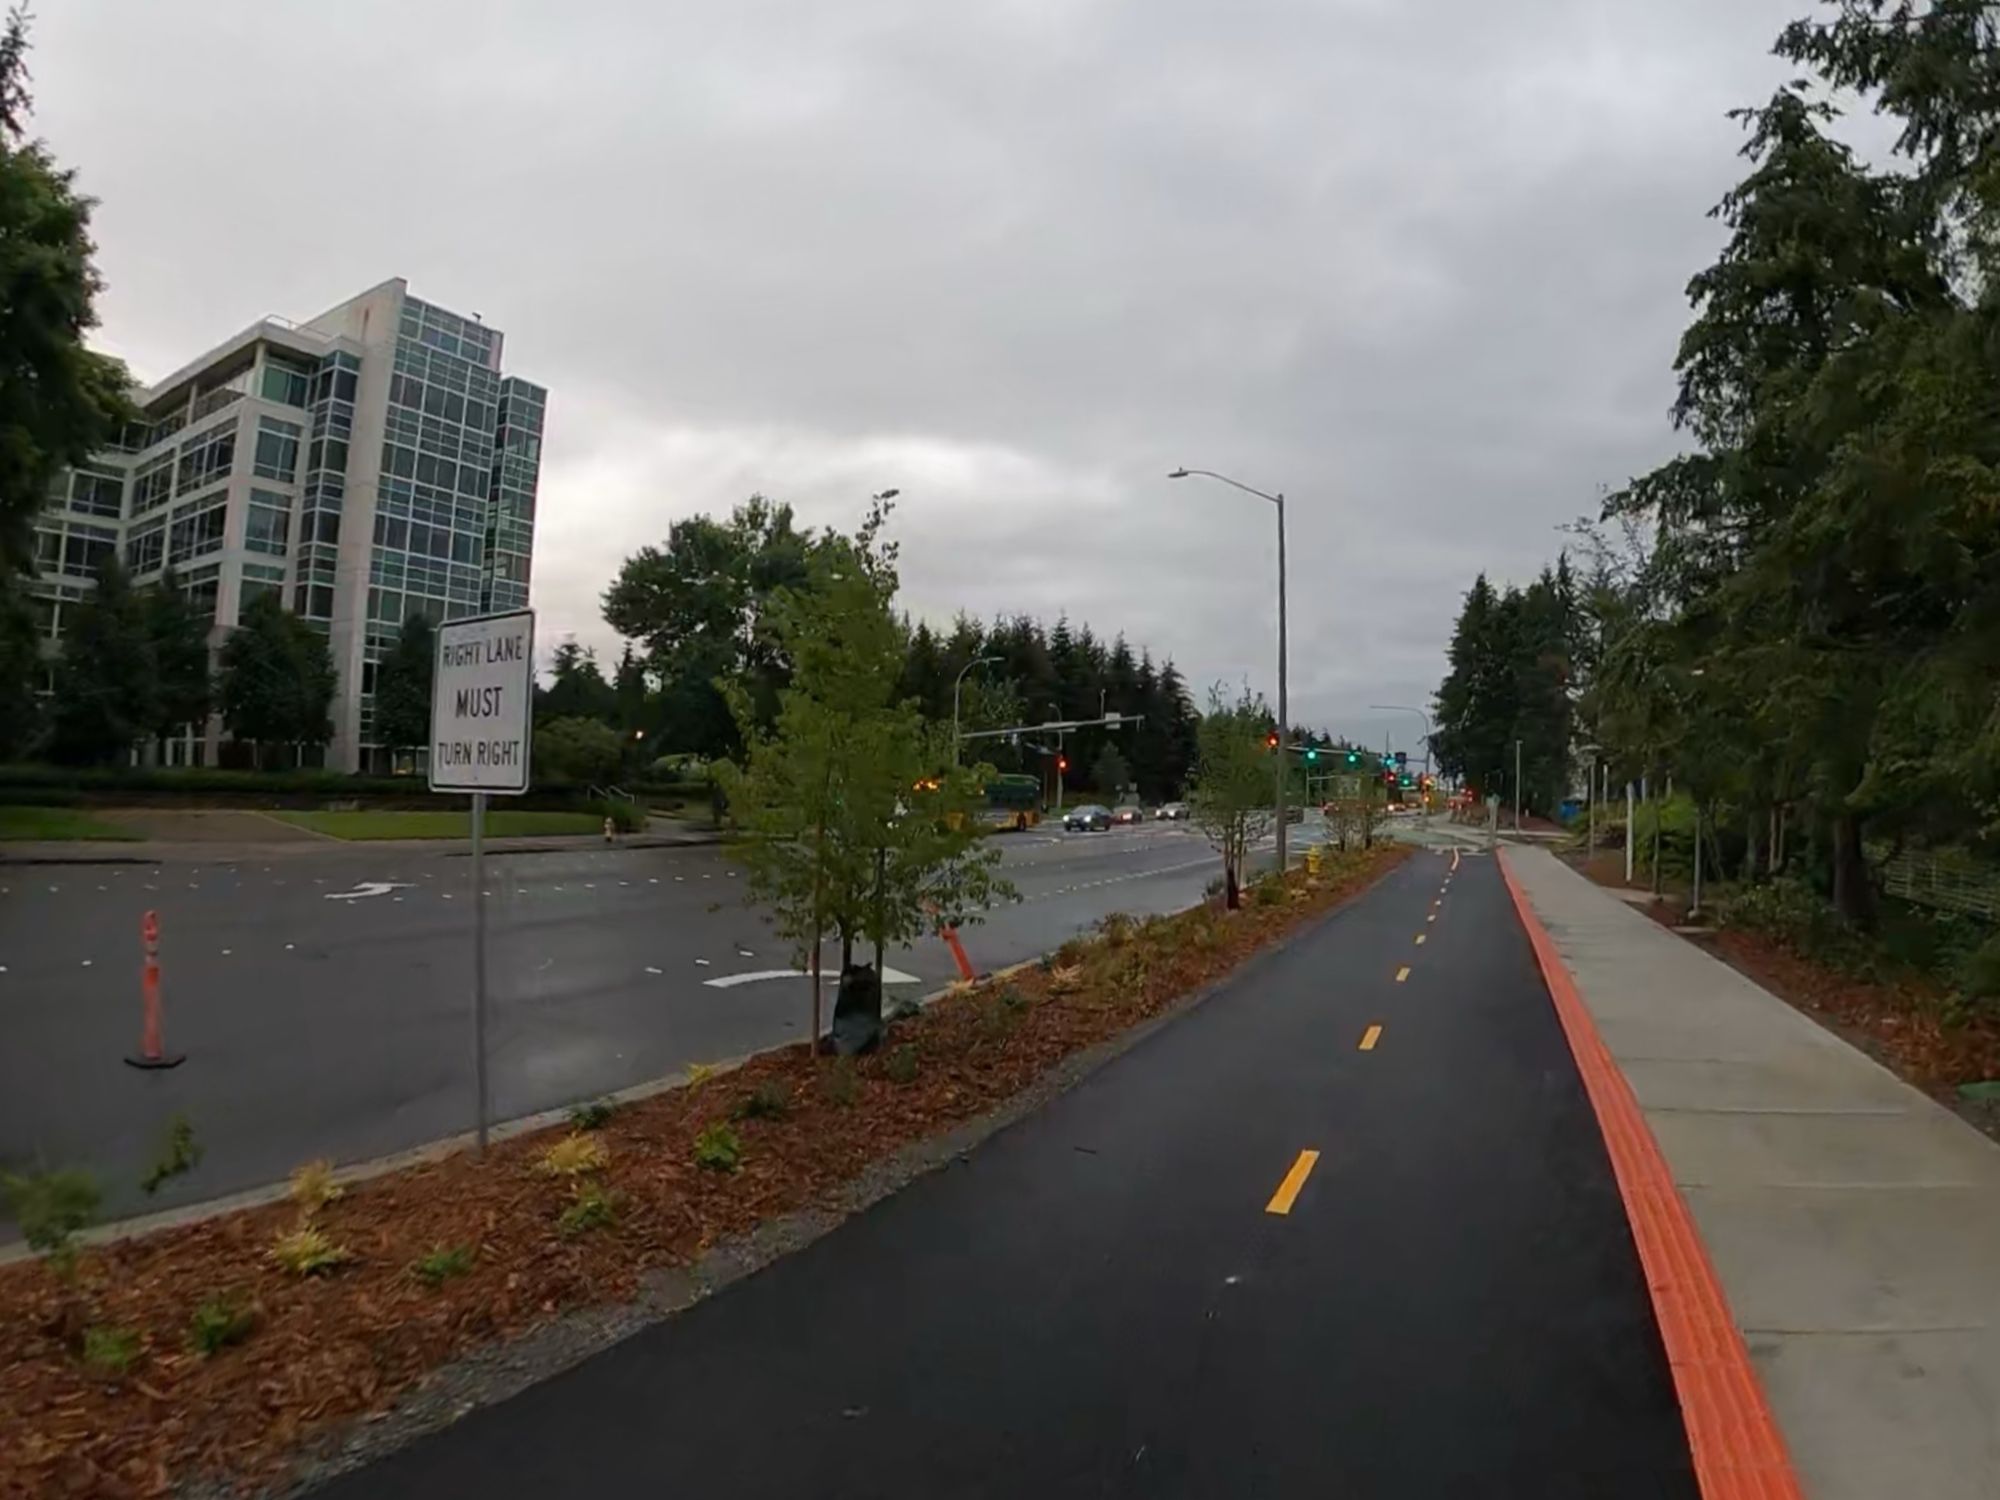
Examples of separated bike paths
- Bike lane on low-traffic road: Indicated by a green line with no outline. This is your typical bike lane separated by paint alongside car traffic lanes. The traffic on this road is low-speed enough to still be comfortable, but less comfortable than a separated path would.
- Busy road: Indicated by a yellow line. This can either be a road that does have a bike lane but along a really high-traffic road, or a lower-traffic road with no bike lane. Either way, it may not be as comfortable as the other two. Consider riding or walking on the sidewalk.
You can use this summary to easily get an idea of how feasible it is to get to your destination and eliminate much of the uncertainty surrounding the safety of the route you will take and hopefully inspire confidence.
Apple Maps — Routing, Navigation
If you have an iPhone, Apple Maps is a great tool for planning your route not only because it takes safety into account, it also provides handy turn-by-turn directions just like you'd get while driving.
Pros:
- Provides turn-by-turn navigation
- Option to prefer safer routes
- Very accessible and user-friendly
Cons:
- Limited to Apple platforms
- Infrastructural improvements may take some time to appear after they are built
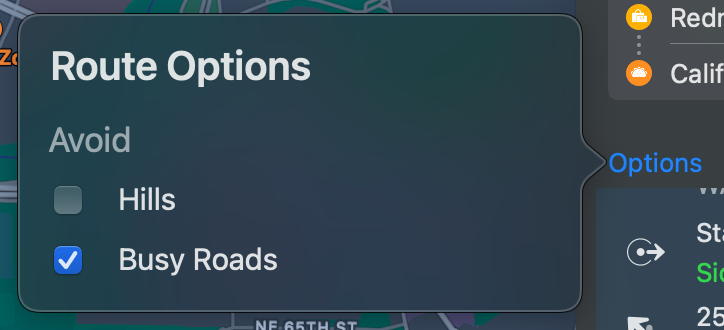
You can use the "Avoid Busy Roads" option to prefer dedicated cycle paths and lower-traffic roads in your routes:
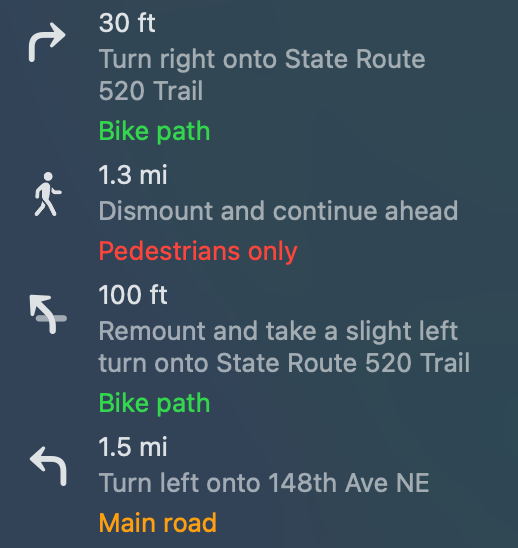
It also provides a summary of what kind of bike accommodations are in place at each point of the route, which can be used to determine the overall safety of the trip:
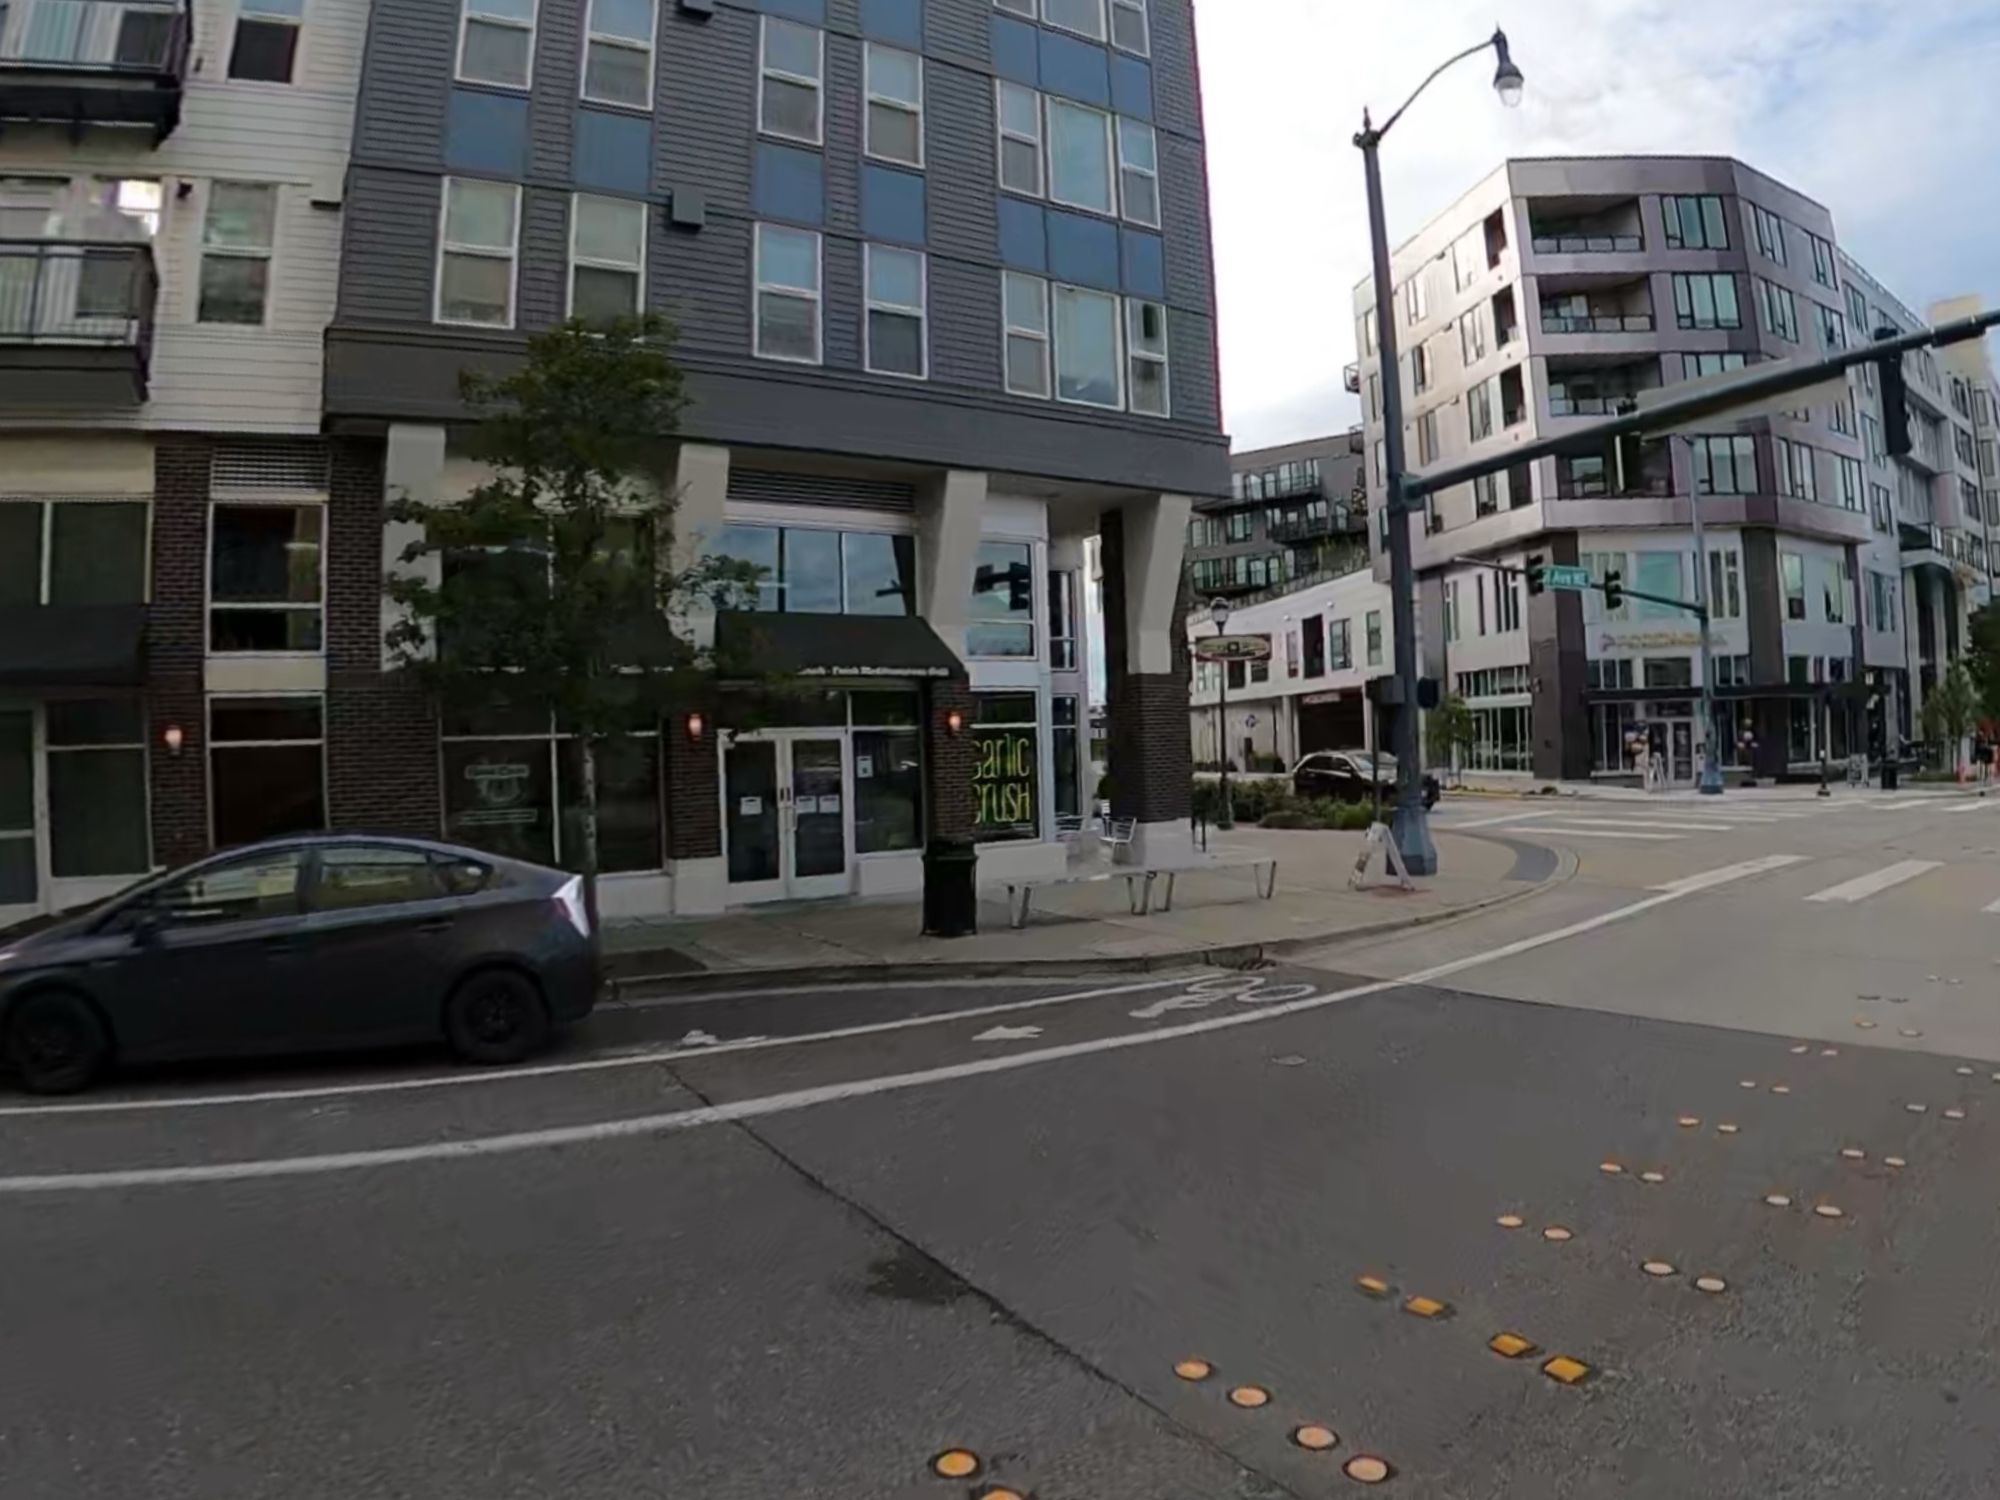
Don't be intimidated by "Main road"! Take a look at the satellite imagery around that part of the route; there is likely a sidewalk you could consider riding or walking on if the road is too unsafe, especially if it's only for a short leg of the route.
While Apple Maps is not as comprehensive or detailed as some of the other routers we'll take a look at, it's probably the most accessible option and a perfectly fine choice for getting around by bike.
Bikemap — Maps, Routing, Navigation
Bikemap is, as the name implies, a mapping application for bike routes. I used to use it when I first got started cycling in my area, but have since discontinued use. Its generated cycle routes are alright, and it provides three different routing profiles based on how strictly you want it to adhere to cycle-friendly paths. The only reason I'm not putting it higher in this list is because many features—including basic ones like cycle-specific navigation and dark mode—are locked behind a subscription.
Pros:
- Cross-platform turn-by-turn navigation with a simple UI
- Different routing profiles based on level comfort and safety
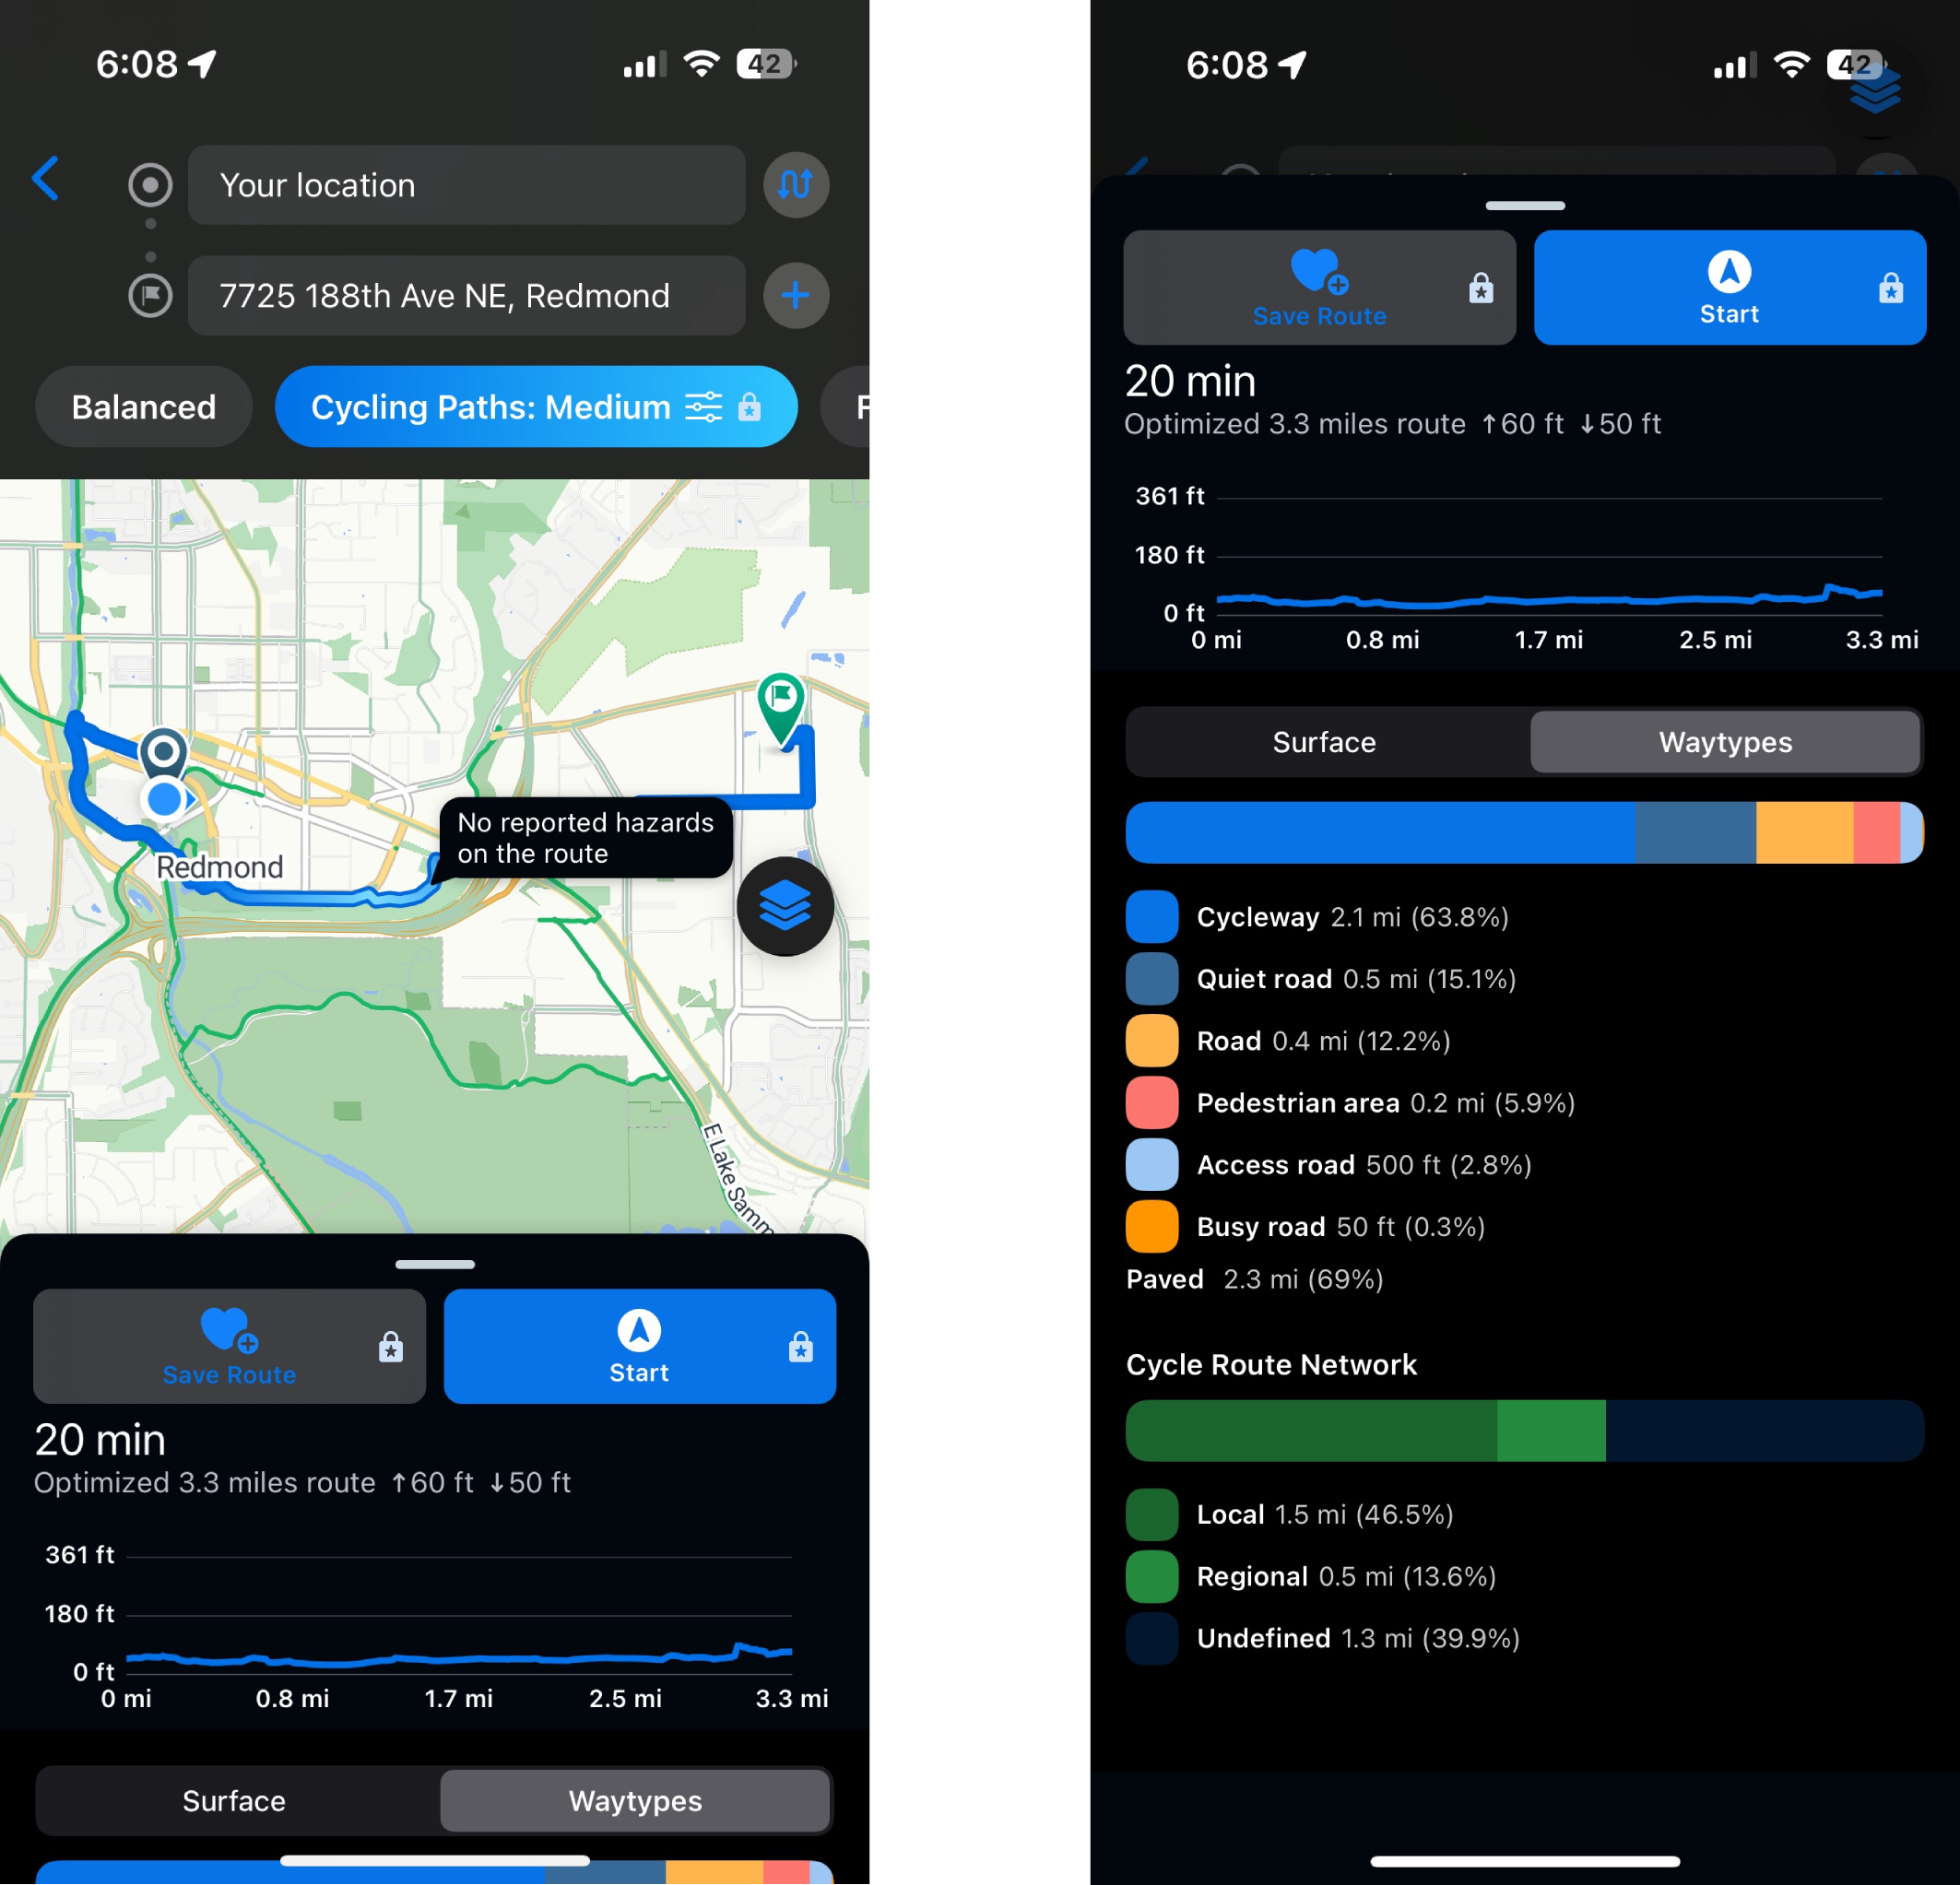
- Users can report potential hazards and closures (à la Waze)
- Provides surface and road type breakdown
Cons:
- Many important features locked behind paywall
- Generated routes can be unnecessarily circuitous
I don't have much else to note about Bikemap other than it is definitely worth a shot if you are in need of turn-by-turn navigation but don't have an Apple device for Apple Maps.
CyclOSM — Maps
While CyclOSM isn't technically a router, it's an excellent tool to understand what kind of bike infrastructure exists in your city and how they all connect to form a network. It's essentially an interactive road map that highlights important features that may be useful when riding a bike—roads with bike lanes, bike paths, bike racks, trails, etc. It's a good way to get a bird's eye view of your city from a cyclist's perspective.
Pros:
- Uses OpenStreetMap data, and changes to it are synced nearly instantly
- Great to understand the "big picture" of your area's bike network
- Important cycle-related features are clearly highlighted
Cons:
- Does not provide routing or navigation (though there are other tools for this)
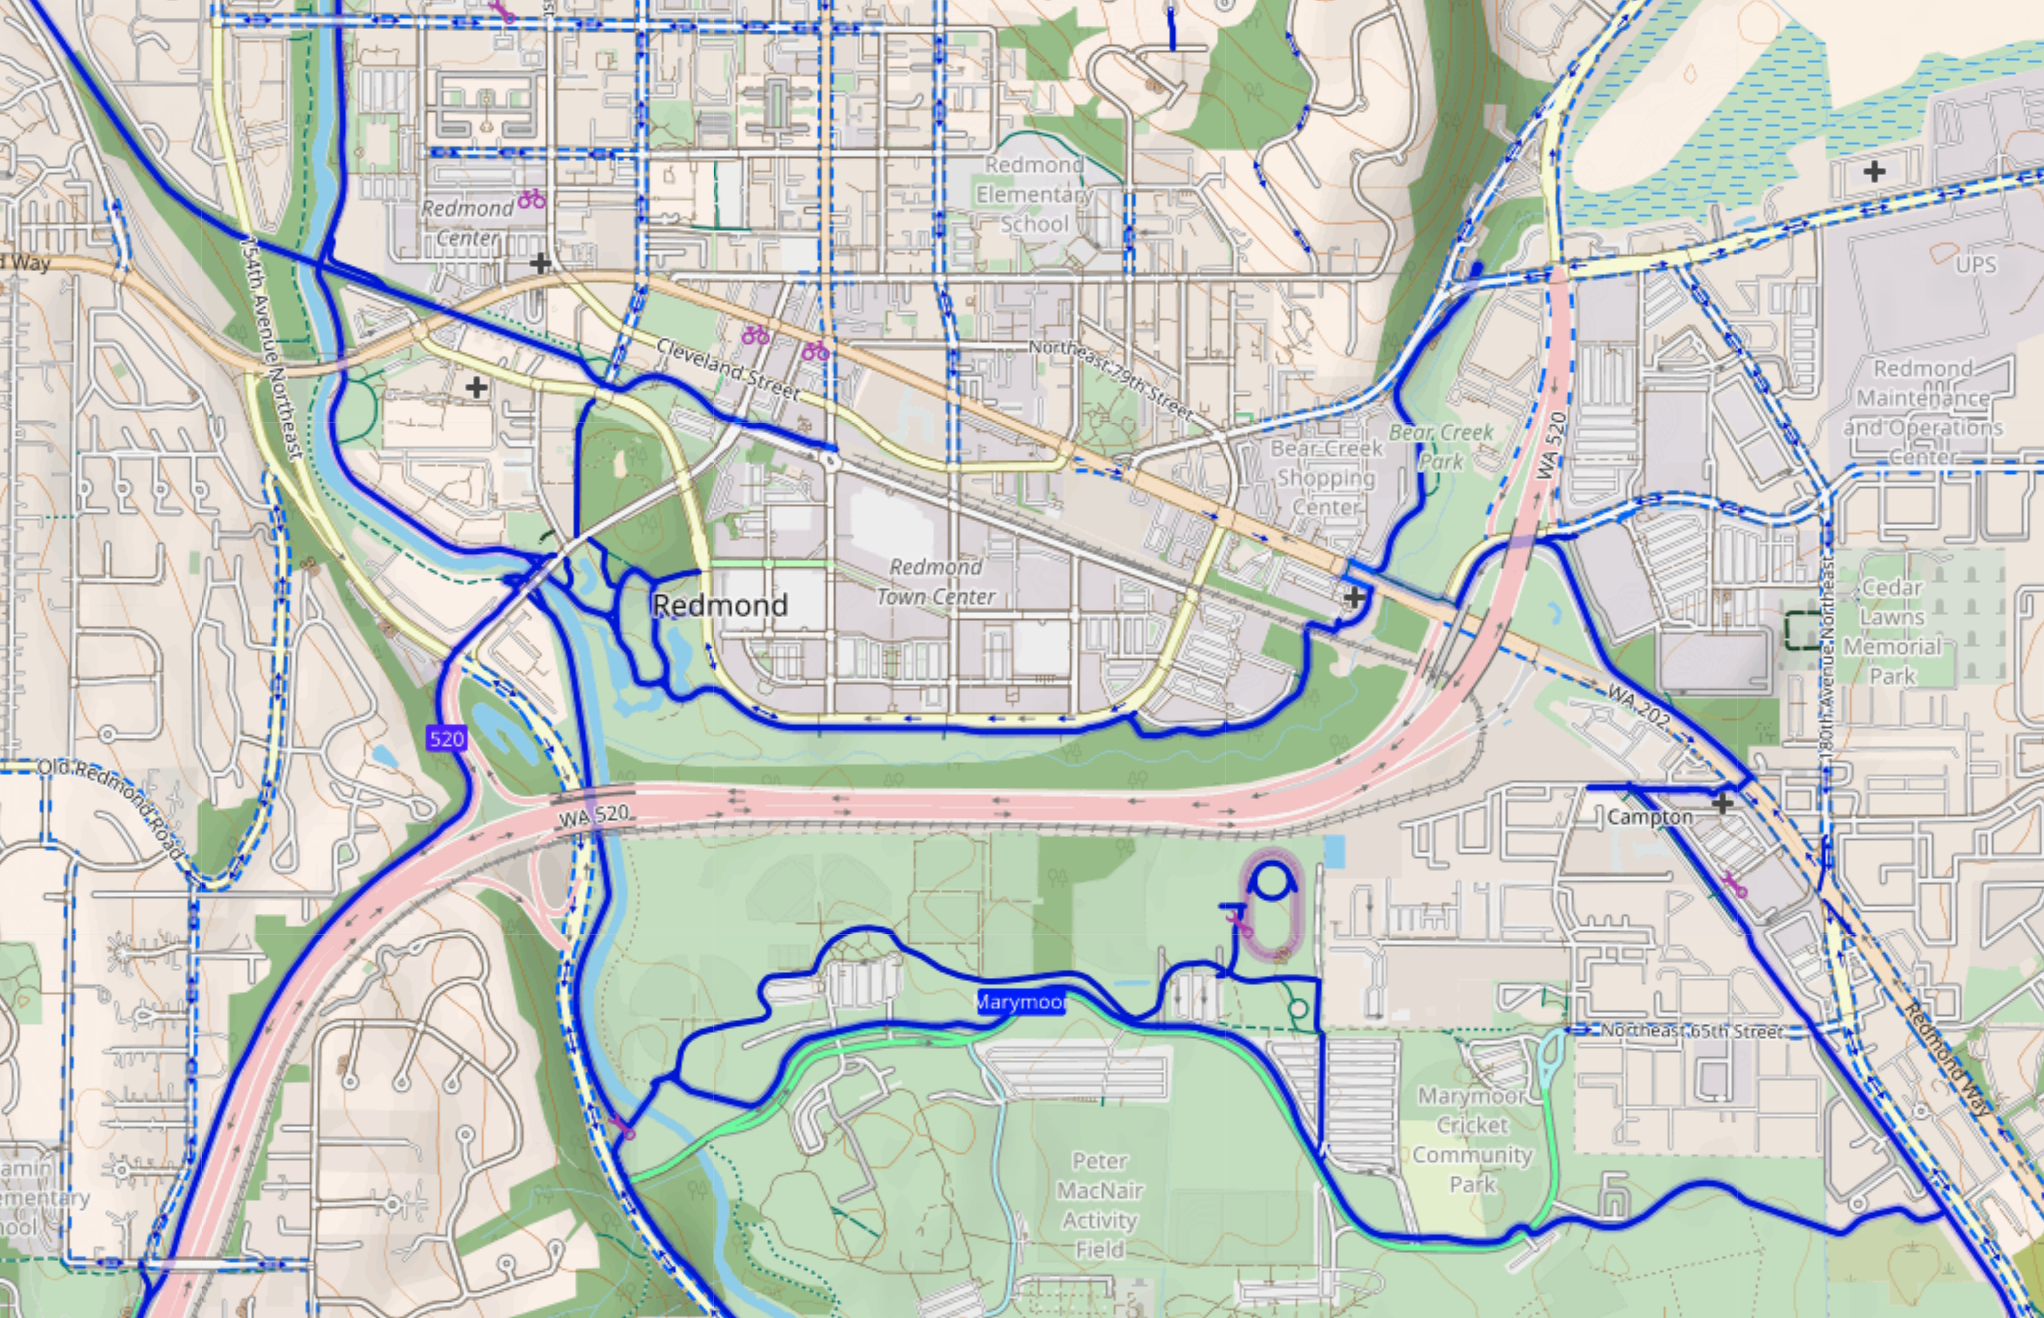
An important thing to note is that its data is sourced from the open data project OpenStreetMap (OSM). If you are unfamiliar, OSM is essentially the Wikipedia of maps: anyone can edit it, and the data is released under a free license for anyone to use. This means that, depending on how active the mapping community is in your area, the data has the potential to be significantly higher quality than commercial map data like Google Maps, which often neglect to map infrastructure that is important to those commuting by bicycle.
Think about this: As one continues to cycle for transport, they add to their mental map of the area, noting useful paths (that may or may not be official), areas of poor infrastructure and how to get around them, and other "hidden gems". But as a new cyclist, you are left in the dark and have to develop this mental map from scratch. However, since anyone can edit OpenStreetMap, these kinds of details can be transferred from a mental map to a digital one. This means anyone has access to the collective knowledge of "native cyclists" in the area and can ride like one.
In fact, pretty much all commercial mapping and routing software (with the notable exception of Google Maps) use OpenStreetMap data in some way—including Apple Maps and Transit.
Since non-route features like bike racks and repair stands are included as well, it's useful for scoping out bike accommodations at your destination, such as if you'll have a convenient place to lock up your bike.
Others
I feel like the options listed here pretty much cover all the bases, but I do have some additional recommendations should you want to explore them:
- OsmAnd: Open source OSM-based mobile maps, routing, and navigation. MANY features, but not super user-friendly. Route preferences are very customizable.
- BRouter: Open source OSM-based routing utility. Provides many different routing profiles for different comfort levels. Useful for pre-planning longer routes at home and uploading to your phone. Very customizable.
- GPX Studio: Similar to BRouter, but more generalized for creating GPX routes.
Connect with Transit
If you find that the cycle infrastructure between you and your destination is devastatingly bad, don't fret just yet! You can fill in the gaps by taking local bus or rail routes. Many of the routing tools mentioned above support multi-modal trips and will offer routes where you cycle to a bus then to your destination, for example. (Try out Transit for that!)
The below advice will probably apply to you, but it's a good idea to check with your local transit authority regarding rules for bicycles onboard various vehicles.
Buses
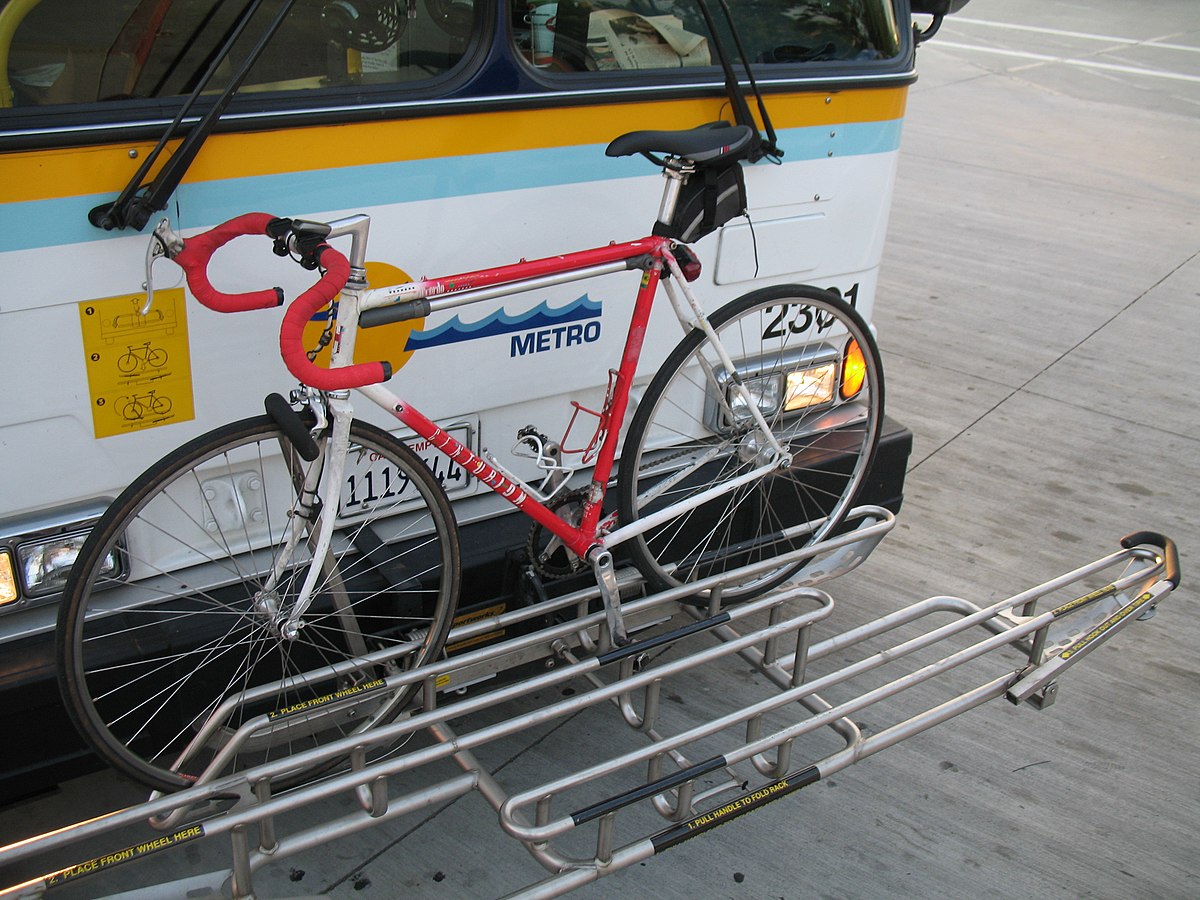
Most buses will have racks on the front where you can store your bike while you ride. They all more-or-less work in the same way, and there are YouTube videos to help you work them. I'll be totally honest, though—using one of these things for the first time was incredibly stressful for me. To make sure it's not stressful for you as well, consider the following tips:
- Your transit authority may provide stationary racks to practice loading and unloading your bike in a stress-free scenario. For example, King County Metro maintains a list of these practice rack locations.
- If you don't have any practice racks nearby, you may find luck at an originating or terminating bus stop. You will likely find idle buses at these locations. Bus drivers are typically very kind people and will almost certainly let you try out the rack on their bus while waiting to be dispatched or before heading back to a bus depot.
- Also practice loading your bike from the side of the bus, as it's possible other bikes may already be on the rack and block you loading from the front.
- If you'd rather avoid this whole bike rack ordeal entirely, you may consider a folding bike which can usually be brought on board without any hassle.
And one more thing: the racks often have weight limits that are noted on your transit authority's website. If you don't already have a bike, keep this limit in mind when shopping around—especially for e-bikes!
Rail
Most rail systems allow bicycles on board in some way or another. The NYC subway, for example, will let you bring your bike on as-is with some additional caveats. Some systems—such as Sound Transit's Link light rail—even provide special accommodations to help you store your bike (in this case, hooks to hang it vertically while you ride). I may sound like a broken record, but when in doubt you should always consult the rules from your transit authority's website. You might find that, as another example, you don't need to use Link's bike hooks—if your bike is too heavy or large for them, no sweat. Just keep it next to you while you ride.
It may be worth noting that if you plan on taking a longer trip and want to bring your bike, Amtrak also accepts bikes on board! Check their website for more details.
Find Community
Doing something for the first time is almost always easier if you have someone more experienced along for the ride, and city cycling is no exception! Seek out groups in your area related to city cycling or transportation in general; these kinds of groups often have ride-alongs that can help you become more familiar and confident riding your area's bike routes in a less intimidating setting. They are also a great resource for any questions you may have, as well as great pieces of hyper-local advice you might not hear elsewhere.
Here are some ideas to help you find your community.
Work Cycling Groups
If you plan on cycling to work, connect with co-workers who are doing the same. See if there is an existing group at your workplace, and if not, propose one! Others may be in the same boat as you, and doing it together may be the catalyst required for both of you to start riding. Consider finding a "commute buddy" that lives close to you and can share a ride to work a few times a week.
Local Organizations and Events
There may be a regional/local organization dedicated to helping improve transportation access in your area. They may also hold events where you can ask questions and interact with others in your community who are excited about alternative transportation options just like yourself. You may also find they offer resources like classes about bike maintenance or traffic rules specific to cycling. Move Redmond is a great example of such an organization.
Community Activism Groups
In a similar vein, there may be community-run activism groups that are simply like-minded individuals that all want more accessible and equitable transportation. It's worth seeking these out! They can point you in the direction of great resources. Eastside Urbanism is an example of such a group.
Ask a Friend
If all else fails and you can't find an existing group, you can ask a friend to tag along with you and figure it out together. Be the change you wish to see in the world!
Purchasing a Bike
Okay, you've done your homework and decided "yes! I can do this!" Woo-hoo! Now you just need to select a suitable steed to carry you on your journey. I don't have much in the way of specific recommendations (i.e., brands or models) but I can provide some general pointers. You can, of course, ask any local groups you've joined as a result of the above section for recommendations as well!
See also: Shifter's video about bike commuting for more information on purchasing the right bike.
Things to keep in mind when buying any bike:
- Type: Most bikes sold in the US are optimized for exercise or sport. You probably want one built for comfort and utility rather than speed. Take note of this as you sift through results.
- Sizing: Make sure the bike is correctly sized for you. Try it out in person if you can! Many brands will have size guides on their website if you can't visit a shop in person.
- Service: Aside from basic maintenance, are there any service options close to you should you need them? Does the bike use standard parts that you can find easily?
- Weight: If you live in a walk-up apartment building or plan to take it on a bus, maybe opt for a lighter model.
- Expandability: If you end up cycling often for transportation, you may want somewhere to carry various items. What options does the bike have for future storage expansion (e.g. pannier bags, front/rear racks, etc.)?
E-Bikes
If one of your concerns is that your area is too hilly, you aren't in shape enough to make it all the way to your destination, or that you might arrive drenched in sweat, don't worry. Rather than getting a standard non-motorized bike, you can consider an e-bike instead. If you're unfamiliar, e-bikes provide electric assistance as you pedal to make it significantly easier to do so. This makes them a prime candidate for those looking to cycle for transportation.
Especially in the past decade or so, e-bike technology has improved so much that there's now many incredibly affordable e-bike brands to choose from. A very common brand I see around the US is Rad Power Bikes, but you may want to do a quick Google for "best ebikes for commuting" since I won't possibly be able to keep this up-to-date forever 😅
Folding Bikes
If storage space is a concern for you, a folding bike may be an appealing choice. This type of bike can fold up to a neat little size that fits neatly in a closet or other small space (such as on board a bus!) They are ideal if you're often traveling to destinations that might not have bike parking accommodations or don't have much space in your home to store a bike.
Folding e-bikes are becoming very popular as well, since they provide the combined benefits of e-bikes and folding bikes. Once again, I've seen Rad Power Bikes around a lot, and they do sell folding e-bikes.
Accessories
Since you're going to be using your bike for transportation, there are some incredibly helpful accessories that you might want to consider purchasing.
Phone Mount
Iff you plan on following turn-by-turn directions, you will probably want to mount your phone so that it's in view. There are mounting systems such as Quad Lock or SP Connect that are sold as a two-part system: a case specific to your phone, and a mount suitable for your bike. These will hold your phone the most securely. Personally, I use a Quad Lock case and it's great! (I've even designed a quick-release shopping cart mount for it, lol)
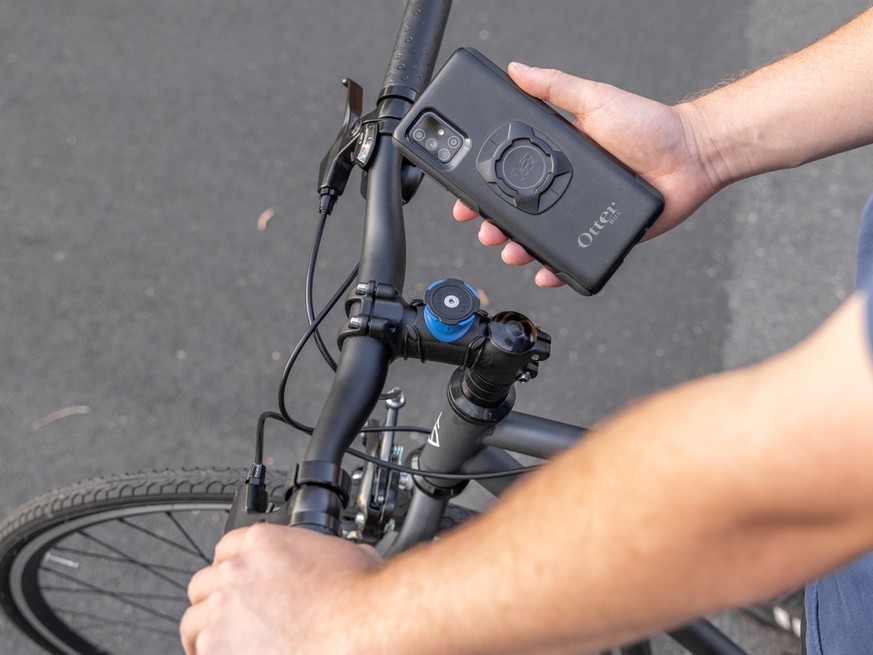
If you're looking for something simpler or cheaper, there are plenty of mounts that simply clamp on to the edges of your phone to keep it in place. Search "phone bike mount" at your favorite evil online retail conglomerate and you'll see what I mean.
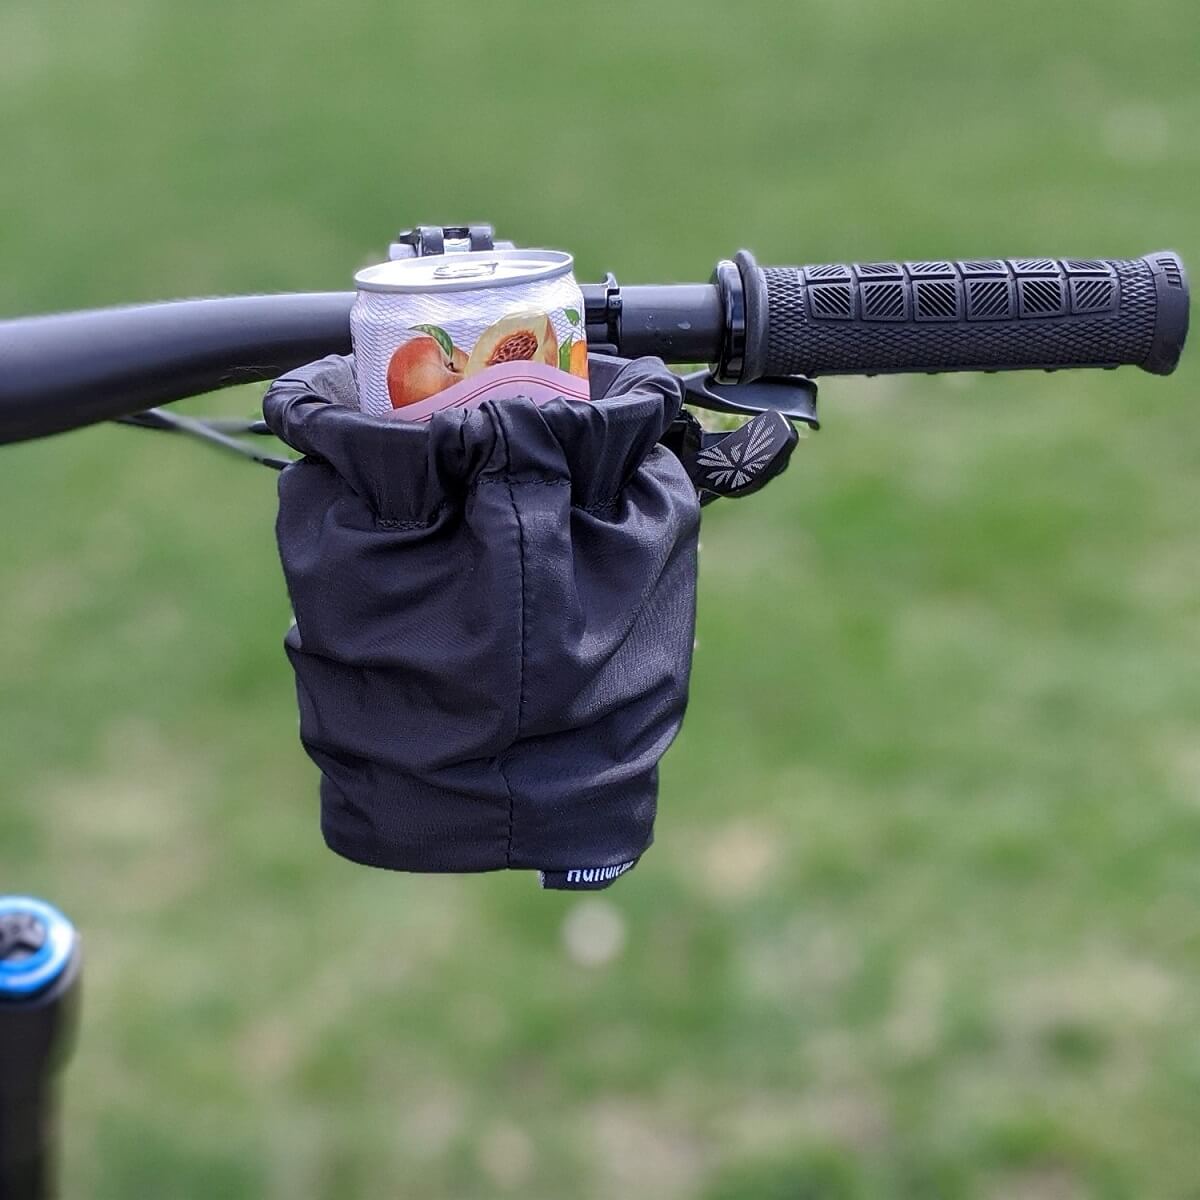
HandleStash
This one may be a bit superfluous for your first ride, but one of my favorite accessories is my HandleStash. It's basically a cup holder for your bike. If you are going to pick up fast food or otherwise want to bring a drink (or other similarly-sized object) along, this is a great one to have!
Additional Resources
Here are some resources that supplement the material in this post nicely.
If you're the type of person that wants to be prepared for anything and want to learn how to ride safely as a cyclist on a road, you can watch videos like Best Side Cycling's uncut rides. You can study how he moves in response to traffic and understand the types of situations you may encounter:
Get Out There!
Now that you're armed with this information, the concerns you had as you started reading this post have hopefully been at least somewhat quelled. Now all that's left is to take action! Get out there and tackle some routes. You've got this :)
If you have any additional questions or feedback for this post, please don't hesitate to reach out. You can email me at tj@tjtjtj.tj and I will do my very best to help.